Thursday, April 29, 2010

Windows XP Mode in Windows 7 – Knowing, Installing and Using

There is a cool feature provided by Microsoft for Windows 7 named Windows XP Mode. Simply this is an improved virtual machine which you can use to install applications that are not compatible with Windows 7.

Some advantages of this over Virtual PC are,

  • Use of virtually installed applications are faster and easy.
  • Virtual applications are performing faster.
  • Your Windows 7 start menu can be used to access all the applications that are installed on Windows XP Mode.
  • No need to start the virtual machine your self.
  • Application is run in normal Windows 7 not in another virtual environment.
  • Copy Paste is supported between applications without needing to install any other software addons.

To setup Windows XP Mode you need to download and install Windows XP Mode from Microsoft site. You can use the following link for that.

http://www.microsoft.com/windows/virtual-pc/download.aspx

There you need to download and install,

  1. Windows XP Mode (WXPM)
  2. Windows Virtual PC
  3. WXPM Update

Note - If you have installed Microsoft Virtual PC you need to uninstall that first, other wise WXPM will not work.

After you installed WXPM, it will be in your start menu.
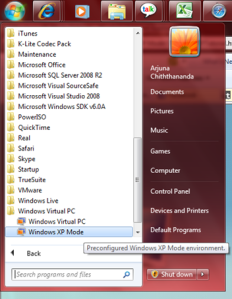
Setting up Windows XP Mode

1. Start WXPM by clicking on the start menu item.

2. Select an appropriate path for the installation of WXPM and give a suitable password, this password will be the password used for the Virtual PC (VPC) user. If you needed to manually connect to the VPC then you need this.

3. Use the next screen to enable the Windows Updates on the VPC.
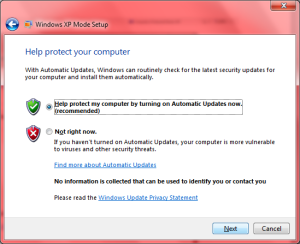
4. Start the setup to initiate the configuration.

5. After the completion of the configuration WXPM will start a of shown below.

6. All your physical drives will be available on the WXPM as well so you will be able to select and install applications from either of them.
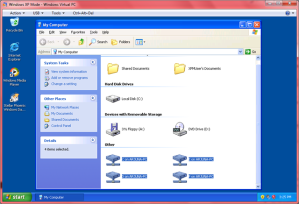
7. For the demonstration I installed “Stellar Phoenix Windows Data Recovery” software since it takes less time to setup.

8. After successfully installing the application on WXPM it will appear on your Windows 7 start menu so you will be able to invoke it directly from Windows 7.
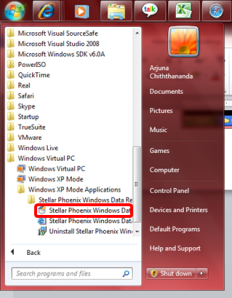
9. As you see there is no difference to the way application is running or shown, and you will even not notice that the application is running in VPC.

Notes – Even though you don’t need, you can even connect to external networks or browse internet using the WXPM, if you do connect the VPC, remember to install a virus guard and enable the firewall for maintaining your computer safety.

Sunday, April 18, 2010

Windows Update Error

Today I faced an error when trying to install few updates for Windows. The message Windows was showing was “Windows update encountered an unknown error.”. So it was not helpful in resolving the issue.

This is happening due to either update not getting downloaded properly, getting corrupt while downloading, space issues in your hard disk, errors while applying updates, etc.

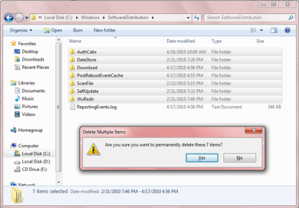
To my satisfaction one thing I did, fixed the issue. If you are also getting similar error I recommend you to first browse to your SoftwareDistribution folder inside Windows installation folder. For example I found it in “C:\Windows\SoftwareDistribution”.

Then delete all the folders in the folder (make sure the Windows Update is closed before doing this) and restart your computer.

After making sure your Windows installation partition is having enough free space (about 1 GB) try running Windows Update again. This time the updates will get installed successfully.

Wednesday, April 14, 2010

Error Installing Windows 7

Recently I tried installing Windows 7 64 bit version in to my HP Pavilion laptop, and I continuously got a problem while installing.

Installer was generating a blue screen with a message Page_Fault_in_NonPaged_Area referring to the file “wimfsf.sys” after coping files and showing the new Windows logo for about 10 seconds.

Since it is mentioning about a page fault and also I am trying with a 64 bit version of Windows I thought this is due to a problem related to hardware of my laptop, so I tried many alterations which included things like, flashing BIOS to various versions including new and old, plugging memory in different ways, installing other OSs to try setup Windows from within them, but nothing helped me to sort the issue except replacing the DVD.

Yes indeed, it was an issue with the installation media (DVD), if you also get a similar error when installing Windows 7, I suggest you to first try installing with a different media.

If you still get an error then try running Windows 7 Upgrade Advisor which can be downloaded from Microsoft. This will analyze your machine and will report you the compatibility details.

Also,

- updating your BIOS to the latest version,

- installing with only one memory module when you are having more,

- disabling special processor (virtualization) and memory (memory caching) functionalities,

- changing hard disk drive options,

will help you getting Windows installed successfully.

Monday, April 12, 2010

SQL Server Reporting Services Error - The report server cannot open a connection to the report server database. A connection to the database is required for all requests and processing. (rsReportServerDatabaseUnavailable)

Recently in one of my virtual servers I got the above error when trying to open the SQL Server Reporting Services (SSRS).

If this is happening to you I recommend checking the following things in your server.


1. Remote Connections in SQL Server.

Go to Start –> All Programs –> Microsoft SQL Server 200x –> Configuration Tools and open SQL Server Configuration Manager.

Now check whether the TCP/IP and Named Pipes are enabled in the 3 Protocol sections.

If they are disabled then enable them then check whether the remote connections are enabled using the SQL Server Management Studio by right clicking on the SQL Server (Parent node in the Object Explorer) and selecting properties.

Then go to the Connections and make sure that the Allow remote connections to this server checkbox is checked.

Then restart the SQL Server Service using the SQL Server Services section in the SQL Server Configuration Manager or by going to the machine services by Start –> Administrative Tools –> Services.


2. Check the SSRS Service Account.

Go to Start –> All Programs –> Microsoft SQL Server 200x –> Configuration Tools and open Reporting Services Configuration Manager. Then click on the Service Account section and verify its details. If you are not sure about the details it’s always good to re-enter them since there is nothing to loose.

3. Check the SSRS Database and Credentials.

Click the Database section and see whether all details are correct. This is very important since SSRS need to get connected to its SQL database to function properly. Pay good attention to validate the SQL Server Name, verify the database mentioned under Database Name exists in the specified SQL Server. If you are not sure of the existing settings just click on the Change Database button and it will open a wizard to step through.

If you already have reports in the SSRS then always try to Choose an existing report server database before Creating a new report server database since when you create a new database you will loose existing customizations you might have.

Then go to the bottom section to see the Credentials provided are correct. I am used to validate these by opening the management studio and trying to connect using the provided account. After validating the account using the management studio, to be in the safe side you can set those settings using the Change Credentials button.


4. Check your Firewall.

If the you have enabled a firewall such as Windows Firewall or a 3rd party firewall it might be blocking the functionalities required. Just try switching off the firewall, if that solves then try creating a rule for the firewall to authorize the required connections.


Hope this helps to correct the error, if not let me know some times I may be able to help.

Sunday, April 11, 2010

.Net Nullable Types

A variable of a nullable type can be used to store the normal range of values allowed by the underlying data type plus the Null. Nullable types are instances of System.Nullable.

Since reference types already supports Null, nullable types represent value type variables which supports null.

For example Nullable<bool> (or spoken like nullable of bool) can be used to store true, false and null.

There are two ways to declare a nullable variable.

Method 1


int? i; // Declaring
i = null; // Initializing

int? i = 4; // Declariong and initializing


Method 2


Nullable<int> a; // Declaring
a = 4; // Initializing

Nullable<int> a = null; // Declariong and initializing


As you see above assigning values to a nullable is same as for a normal variable. But when retrieving the value you need to be little careful.

Method 1 – Using GetValueOrDefault

GetValueOrDefault property is available for nullable variables. If the variable is null it will get the default value for the type otherwise the actual value it contains.


textBox1.Text += "Value of i - " + i.GetValueOrDefault();


Method 2 – Using variable.Value

When you are going to retrieve the value inside the variable using .Value be careful to first check whether there is actually a value in the variable, otherwise .Net will generate an InvalidOperationException with a description of “Nullable object must have a value”.


// \r\n is used to insert a new line.
if (i == null)
    textBox1.Text += "\r\n" + "i is Null";
else
    textBox1.Text += "\r\n" + "i is - " + i.Value;


or


// Environment.NewLine is equal to placing a new line or \r\n.
if (a.HasValue)
    textBox1.Text += Environment.NewLine + "a has - " + a.Value;
else
    textBox1.Text += Environment.NewLine + "a has Null";


The full code would look like the following.


  1. // Declaring Method 1
  2. int? i; // Declaring
  3. i = null; // Initializing
  4. //int? i = 4; // Declariong and initializing
  5. // Get value using GetValueOrDefault().
  6. textBox1.Text += "Value of i - " + i.GetValueOrDefault();
  7. // \r\n is used to insert a new line.
  8. if (i == null)
  9.     textBox1.Text += "\r\n" + "i is Null";
  10. else
  11.     textBox1.Text += "\r\n" + "i is - " + i.Value;
  12. // Declaring Method 2
  13. //Nullable<int> a; // Declaring
  14. //a = 4; // Initializing
  15. Nullable<int> a = 4; // Declariong and initializing
  16. // Environment.NewLine is equal to placing a new line or \r\n.
  17. if (a.HasValue)
  18.     textBox1.Text += Environment.NewLine + "a has - " + a.Value;
  19. else
  20.     textBox1.Text += Environment.NewLine + "a has Null";


The output would be,

Value of i - 0
i is Null
a has – 4

You could use the ?? operator to assign the default value for a non nullable variable while the nullable contains null as the current value.


int? Null_X = null;
int NonNull_y = Null_X ?? -1;


Friday, April 09, 2010

Features of Search Engines

How many of you know that common and popular search engines like Google and Bing are providing many other functionalities than searching?

Yes it is true there are many functionalities within them that most of us don’t know.

Following are some features, you can try these out by typing the italic text in your favorite search engine.

  1. Finding the date and the time of a place. – “Time Sri Lanka”, “time Melbourne
  2. Checking spelling of words. – “Cheking”, ”mathmatics”
  3. Finding results of arithmetic. – “(25*34)+78”, “2**5”
  4. Finding the weather if a place. – “Weather Colombo”, “weather Changi”
  5. Finding the populations of countries or popular cities. – “Population UK”, “population Sri Lanka”
  6. Converting units. – “12.5km in Meters”, “3km in inches”
  7. Stock details. – “MSFT”, “AAPL”
  8. Find similar word (Synonyms). – “~Cooking”, “~hot drinks”
  9. Finding currency values. – “1 GBP in AUD”, “89.34 AUD in USD”
  10. Finding maps. – “New York Map”, “Sydney map”
  11. Finding definitions of words. – “Define Computer”, “define language”
  12. Other than above you can find about Books, Movies, Air Line Schedules etc. But they are widely for other countries like UK, US.

While searching you can use special characters like wild cards, concatenate, subtract to help while searching. Try them out to find the results by your own.

Sunday, April 04, 2010

How to Read and Write Text

Reading and writing to text files had been made easy by .Net.

Following code will create a text file and insert 2 lines to it and will then read it and display.


  1. // System.IO is required for file handling.
  2. using System.IO;


  1. // Creating a stream writer object.
  2. // @ is used before the string to avoid the string getting broken by the /.
  3. StreamWriter stWriter = new StreamWriter(@"C:\Backup\File.txt");
  4. // Writing into the file.
  5. stWriter.Write("It is now ");
  6. stWriter.WriteLine(DateTime.Now);
  7. stWriter.WriteLine("The End");
  8. // Closing the file.
  9. stWriter.Close();
  10. // Reading the file.
  11. // Checking the availability of the file.
  12. if (File.Exists(@"C:\Backup\File.txt"))
  13. {
  14.     // Without using the @, \\ also can be used to represent \ inside of a string.
  15.     using (StreamReader stReader = File.OpenText("C:\\Backup\\File.txt"))
  16.     {
  17.         // Temporary variable.
  18.         string str = "";
  19.         while ((str = stReader.ReadLine()) != null)
  20.         {
  21.             // Assigning to a label.
  22.             label1.Text += str + "\n";
  23.         }
  24.     }
  25. }
  26. else
  27.     MessageBox.Show("Error, File cannot be found.");