Monday, November 17, 2008

Installing HyperV Integration Services

I think at least some of you might have started using Hyper V.
Did you feel how difficult to move from your Host Operating System (OS) to Guest OS (You have to click some keyboard combinations to move in and out).
To make our life easier you can install HyperV Integration Services to the guest OS.

To install, after starting your virtual machine click on the Action menu and click Insert Integration Services Setup Disk. This will start the installation process. After this finishes you no need to click key sequences to go back and forth among the OSs.
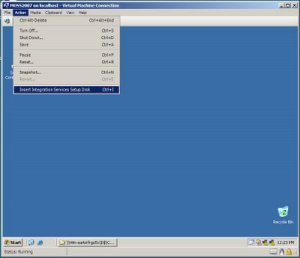
This will also install the required components so that the virtual machine will be able to communicate with local area networks and internet.
Please note that you need to install the Integration Services in each and every virtual machine separately.

Thursday, November 13, 2008

Google Video Chat

Check out the new Google Video chat.
Now you can video chat using GMail.

http://mail.google.com/videochat

Hyper-V

Hyper-V is the name for the next generation hypervisor-based server virtualization technology from Microsoft.
This is included in Windows Server 2008 as a role and enables you to create and manage virtual servers or machines.
A free version of this also available which is named as Microsoft Hyper-V Server 2008. This is a Windows core having only the Hyper-V functionality enabled.
If interested better visit the following sites.
http://en.wikipedia.org/wiki/Hyper-V
http://www.microsoft.com/windowsserver2008/en/us/hyperv-overview.aspx
http://www.microsoft.com/windowsserver2008/en/us/hyperv-faq.aspx

Monday, November 10, 2008

Enabling Forms Authentication in SharePoint

Recently I needed to change the authentication of one of the application that I did using SharePoint to forms. I needed to authenticate users using Active Directory (AD). Even there are many sources explaining how to do it I found most of them are not full. So thought to put an article my self.
The default authentication method of SharePoint is Windows. It will use a window to get the user information while logging in.

To change the authentication first you need to login to the Administrator site.

Now select Application Management and click on the link Authentication Providers under Application Security.

In the Authentication Providers screen first make sure the correct web application is selected. If not, select the correct application using the drop down in the top left corner of the page.
After selecting the correct application click on the Default zone (Please note that here I am going to change the default zones' authentication. If you are to change in another zone simply select the required zone).

In the Edit Authentication page select Forms as the Authentication Type then in Membership Provider Name type AD, which we are to setup later. Then click the Save button.

As of the result of changing the authentication providers the Web.Config file will be changed accordingly automatically. But this is not enough we need to enter the membership provider details ther in site Web.Config file and Administrator site Web.Config files.
To do the necessary changes open both Web.Config files. Both files needed to be updated with the same information.

1. In the connection strings section add the following line.
This specifies the connection string to the AD. (Please note that my full computer name is 'ironone-ms-t01.MS.TEST' and my domain is 'MS.TEST'. You definitely need to change them according to your domain details.

2. Inside System.Web add a membership provider by entering the following text.
You should change the details of the connection according your settings but make sure you do not change the name from 'AD' to anything else, otherwise it will not work.
Application Web.Config
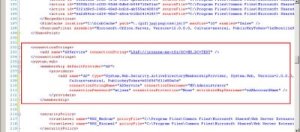
SharePoint Administration Site Web.Config
Save both Web.Configs and do an IIS reset.
Go back again to the administration site and select Application Management. Now select Policy for Web application under Application Security.
After making sure that the correct web application is selected, click on Add Users.
Select the Default as the zone and click next.
When choosing users type the full user name preceding AD:. For example to add administrator type AD:Administrator. Under the permission section select the Full Control - Has full control check box and click Finish.
As the final step you have to change the site collection administrators. For this click on Site Collection Administrators under SharePoint Site Management in Application Management.
After verifying the selected application enter Primary Site Collection Administrator as AD:Administrator. If you want you can fill in Secondary Site Collection Administrator as well. After finishing click Ok.
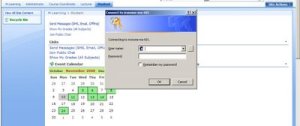
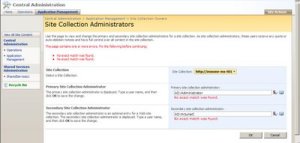
Now go back to the site and try to login, you will see that the traditional windows login page is replaced with a simple login web page. Since this login page is too simple I did some improvements to the login page and created my own one as you can see below.

Thursday, October 23, 2008

Correcting the error at User Control

Recently I got an error in an user control which I used to create users in Active Directory. This user control started to fail in SharePoint after deploying it in to a different server. It threw the following error,

  • Exception has been thrown by the target of an invocation.

The Inner Exception was

  • Access is denied. (Exception from HRESULT: 0x80070005 (E_ACCESSDENIED))

After a bit of a struggle I found that the error was due to inappropriate setting in Web.Config file.

To correct it set identity impersonate to false.

<identity impersonate="false" />

Sunday, October 05, 2008

Creating an Excel Sheet using .Net

In this entry I will show how you can create a Microsoft Excel file using .Net.

// Create the Excel Application object.
ApplicationClass ExcelApp = new ApplicationClass();
// Set the visibility of the application.
ExcelApp.Visible = true;
// Create a new Excel Workbook.
Workbook ExcelWorkbook = ExcelApp.Workbooks.Add(Type.Missing);
// Create a new Excel Sheet.
Worksheet ExcelSheet = (Worksheet)ExcelWorkbook.Sheets.Add(ExcelWorkbook.Sheets.get_Item(1), Type.Missing, 1, XlSheetType.xlWorksheet);
try
{
// Loop for 10 rows.
for (int rwCount = 1; rwCount <= 10; rwCount++)
{
// Loop for 3 columns.
for (int clmCount = 1; clmCount <= 3; clmCount++)
{
ExcelSheet.Cells[rwCount, clmCount] = "This is Row - " + rwCount + " Column - " + clmCount;
}
}
// Save the Excel sheet.
// The @ symbol makes the string to contain any special characters inside the string without breaking the string.
ExcelApp.Save(@"C:\Projects\Ex.xls");
}

Accessing Data in an Excel File using .Net

In this article I will show how you can open Microsoft Excel files using .Net.
You can use OLE objects to access data in Excel files as of you are accessing SQL Server data using SQL objects.

// Create an OLEDBConnection to connect to the Excel file.
// I'm getting the required file by using a file dialog.
// The @ symbol makes the string to contain any special characters inside the string without breaking the string.
OleDbConnection dbConnection = new OleDbConnection(@"Provider=Microsoft.Jet.OLEDB.4.0;Data Source=" + openFileDialog1.FileName.ToString()+ @";Extended Properties=""Excel 8.0;HDR=Yes;""");
// Open the connection.
dbConnection.Open();
// Create a command object to work on the data.
// Note that I have given the sheet name as [Sheet1$] to retrieve data from that named sheet in the particular Excel file.
OleDbCommand dbCommand = new OleDbCommand("SELECT * FROM [Sheet1$]", dbConnection);
// Creating a data reader to read data.
OleDbDataReader dbReader = dbCommand.ExecuteReader();
// Get the position of the column Desc 1.
int SearchingItem = dbReader.GetOrdinal("Desc 1");
// Read through the data.
while (dbReader.Read())
{
// Traverse through all the data columns.
for (int i = 0; i <>
{
ExcelSheet.Cells[CurrentRowCount, i + 1] = dbReader.GetValue(i).ToString();
}
}